Rebuilding an I-Mag 423 Cold Cathode Sensor
Disassembling the 423 I-Mag Sensor:
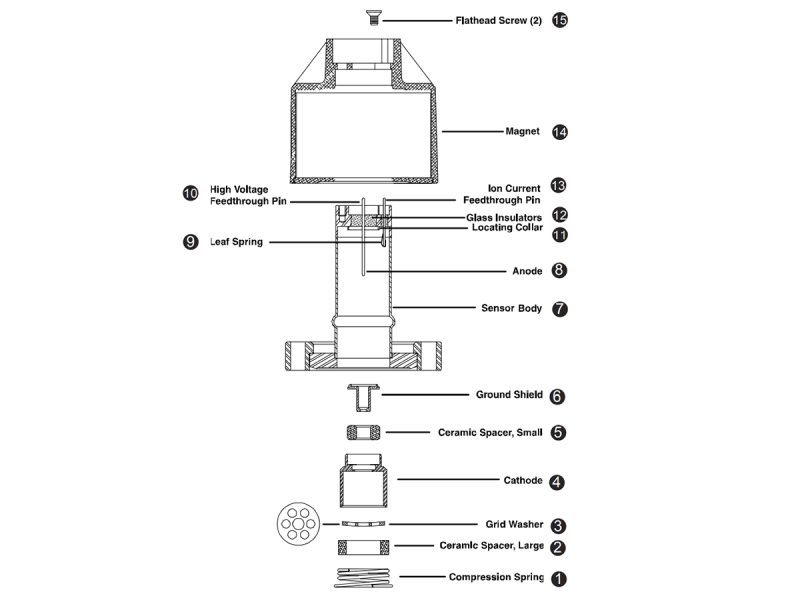
423 I-Mag Sensor Diagram
Tools required: clean tweezers; clean smooth-jaw, needle-nose pliers
- Turn Power off to the Controller.
- Loosen the thumb screw on top of the sensor cable and remove the cable.
- Loosen the two flat head screws.
- Remove the magnet.
- Using the smooth-jaw, needle-nose pliers, firmly grab the compression spring at the tip closest to the flange.
- Pull on the compression spring while rotating to free it from the formed groove of the sensor body. Continue to pull until the compression spring is completely free.
- With the vacuum port facing up, carefully remove the ground shield, small ceramic spacer, cathode, grid washer and large ceramic spacer from the sensor body.
Do not bend the anode or the leaf spring on the ion current feedthrough pin when assembling or disassembling the Sensor.
Cleaning the 423 I-Mag Sensor:
Depending on the degree of contamination and application of the Sensor, the internal parts may be cleaned - either ultrasonically, with mild abrasives, or chemically.
Do not touch any vacuum exposed part after cleaning unless wearing gloves.
Ultrasonically clean using high quality detergents compatible with aluminum such as ALCONOx®.
Scrub with a mild abrasive to remove most contamination. Scotch-Brite® or fine emery cloth may be effective. Rinse with alcohol.
Clean aluminum and ceramic parts chemically in a wash (not recommended for semiconductor processing), such as a 5 to 20% sodium hydroxide solution, at room temperature (20°C) for one minute. Follow with a preliminary rinse of deionized water. Remove smut (the black residue left on aluminum parts) in a 50 to 70% nitric acid dip for about 5 minutes.
Chemical cleaning should not be used to clean the anode; mild abrasives or ultrasonic cleaning are acceptable.
Do not damage the leaf spring while cleaning the Sensor.
Each of the above cleaning methods should be followed with multiple rinses of deionized water.
Dry all internal components and the sensor body in a clean oven set at 150°C. The two ceramic spacers, are slightly porous and will require longer drying time in the oven to drive off the absorbed water.
Assembling the I-MAG Sensor:
Wear gloves and assemble with clean tools.
- Roll the sensor body on a flat surface and, looking down the port, check the anode for any radial runout motion. It should be straight and centered with the sensor body for proper operation.
- Install the ground shield using tweezers. Make sure that the ground shield drops into the locating collar.
- Slide the small ceramic spacer over the small end of the ground shield.
- Check that the leaf spring will contact the base of the cathode as shown to the right. If not, remove the small ceramic spacer and the ground shield, and gently bend the leaf spring towards the anode and then replace the ground shield and ceramic spacer.
- Slide the cathode, the grid washer, and the large ceramic spacer into place. The grid washer has a concave shape. Refer to the figures to see its installation orientation.
- Insert the small end of the compression spring into the sensor body.
- Using your thumbs, push the larger end of the spring into the sensor body until it is contained within the tube's inside diameter.
- Using the smooth-jaw, needle-nose pliers, work the compression spring down into the sensor body until it is fully seated in the formed groove.
- Inspect the ground shield and the grid washer to verify they are centered with respect to the anode.
- If adjustment is needed, gently reposition the grid washer/cathode assembly, taking care not to scratch the grid washer.
We suggest you measure the resistance between the ion current feedthrough pin and the grid washer to verify that the leaf spring is in contact with the cathode. The measurement should indicate a short circuit between them. There should be an open circuit between the ion current feedthrough pin and both the high voltage feedthrough pin and sensor body.
The I-Mag sensor is ready for installation. If it is not immediately installed, cover the flange with clean, vacuum grade aluminum foil and cap with a flange protector.
 Ultra-High Velocity